Need some input with my failed attempt at wood filler.
Forum rules
Welcome to the Leverguns.Com General Discussions Forum. This is a high-class place so act respectable. We discuss most anything here other than politics... politely.
Please post political post in the new Politics forum.
Welcome to the Leverguns.Com General Discussions Forum. This is a high-class place so act respectable. We discuss most anything here other than politics... politely.
Please post political post in the new Politics forum.
Need some input with my failed attempt at wood filler.
Picked up a Winchester 94 that was plastered with decorative tacks. Was going to walk away from it originally until after running the seriel number, i discovered it is of my birth year circa 1972. I have been looking for a 1972 for almost twenty years when i first got very intereted in lever guns. Anyway, i removed the tacks, stripped the finish and applied some wood filler and sanded where i thought i had to then applied a walnut stain. As you can see, the stain highlighted the holes which i filled with wood filler. I am not above starting over and redoing. I just need some guidance.....
"Courage is being scared to death but saddling up anyways" - John Wayne -
Re: Need some input with my failed attempt at wood filler.
Stains can be very problematic. At this point you probably won't get that stain out of the stock, so the thing to do is match your patches to the stained stock and then put some oil or varnish over the whole thing. Actually, if I'm staining wood, I tend to match any putty patches to the stained wood anyway, so I would stain it then fill.
I have some dyes I use in epoxy - called Trans-tint, pretty expensive, but they get used a drop at a time, so 4 oz is a life time supply. They won't go into 5 minute epoxy, but the white marine stuff (called PC-11) tints up great using them. For walnut I use 3 colors, a reddish brown, dark brown, and honey amber.
But that may not be a practical solution for you, so alternatively, I would get some walnut dust and mix it to a thick putty using tung oil as the binder. Might want to mix a little of your stain in, but the dust will soak up more stain than did the stock, making it darker, so just use a little if you need it.
Re: Need some input with my failed attempt at wood filler.
What material did you use to fill the holes? Would a felt tip marker color it? If so, go to a hobby store and try to find one in that color. Paint pens can also be found in hobby stores. A couple of them might help if you tried 2 or 3 different shades and sort of made it look like natural differences in the wood.
D. Brian Casady
Quid Llatine Dictum Sit, Altum Viditur.
Advanced is being able to do the basics while your leg is on fire---Bill Jeans
Don't ever take a fence down until you know why it was put up---Robert Frost
Quid Llatine Dictum Sit, Altum Viditur.
Advanced is being able to do the basics while your leg is on fire---Bill Jeans
Don't ever take a fence down until you know why it was put up---Robert Frost
Re: Need some input with my failed attempt at wood filler.
I like it like it is! That's the history of the gun. Battle scars from its enslavement by savages.
Kind regards,
Tycer
----------------------------------------------------------------
http://www.saf.org - https://peakprosperity.com/ - http://www.guntalk.com
Tycer
----------------------------------------------------------------
http://www.saf.org - https://peakprosperity.com/ - http://www.guntalk.com
Re: Need some input with my failed attempt at wood filler.
.
FWIW, the only way I've found to do virtually invisible repairs is to first obtain some sawdust from the stock I'm working on (by drilling a few small holes in the butt, under the buttplate) & mixing the sawdust in with the repair epoxy, before removing the existing finish ( by stripping or sanding) from the entire stock (including forend) & then staining everything at the same time to get a decent match.
.
Re: Need some input with my failed attempt at wood filler.
Not encouraging you to give up on improving your arm to your satisfaction, but you could just leave it as you've made it, and let it tell the story.
It doesn't look as bad as you make it out, although every fellow who starts a project wants their thing to be 'perfect'.
My thoughts were sand it or strip it and start over, this time steaming out the dings, holes, and gouges (however you see the tack holes), or buy and fit a replacement until you get this one to a condition you find more pleasing.
Personally, not being a fan of the crescent buttplate, I see a host of possiblities for the piece of wood, with one or two of them resulting in an usable buttstock.
Last edited by FWiedner on Mon Jun 03, 2013 7:03 pm, edited 1 time in total.
Government office attracts the power-mad, yet it's people who just want to be left alone to live life on their own terms who are considered dangerous.
History teaches that it's a small window in which people can fight back before it is too dangerous to fight back.
-
- Advanced Levergunner
- Posts: 6972
- Joined: Tue Apr 03, 2007 8:52 pm
- Location: Ridgefield WA. USA
Re: Need some input with my failed attempt at wood filler.
For me, that would be a good excuse to make a new stock for it.
That said, Looks good for a shootin gun.
-
- Levergunner 2.0
- Posts: 153
- Joined: Mon May 13, 2013 6:16 am
- Location: Witness Protection Program.
Re: Need some input with my failed attempt at wood filler.
Wood repair is always a situation where whatever works best for you or what ever you are able to live with. There are many good repairs out there and the one that works is the one that suites your taste.
Re: Need some input with my failed attempt at wood filler.
That's some very good advice given there!Pete44ru wrote:"FWIW, the only way I've found to do virtually invisible repairs is to first obtain some sawdust from the stock I'm working on (by drilling a few small holes in the butt, under the buttplate) & mixing the sawdust in with the repair epoxy, before removing the existing finish ( by stripping or sanding) from the entire stock (including forend) & then staining everything at the same time to get a decent match."
The other thing I thought of is that sometimes a different type of stain -- like a dark brown leather stain, or Dark Walnut Danish Oil, might just do a better job of blending in the wood & repairs. I've used Danish Oil before with much success at minor repairs like this, when combined with Pete's sawdust trick too.
Good luck!
Old No7
"Freedom and the Second Amendment... One cannot exist without the other." © 2000 DTH
Re: Need some input with my failed attempt at wood filler.
Pete44's method works great! If you are sanding the whole stock down you can fill gouges or holes by laying
a bead of superglue in the spot,then while it is still wet sand over and all around that spot with fine sandpaper.The
dust mixes with the glue.Only sand a few moments letting the glue dry for five minutes.Then put more glue on the
spot and repeat.It sometimes takes six or more times but it seems to be faster with the superglue rather than the
epoxy because of the quick drying time.
What in the wild world of sports is going on here
Re: Need some input with my failed attempt at wood filler.
I think you're gonna have an awful time trying to match filler.
Filler is notoriously difficult to stain - it absorbs too much.
The end grain of any slivers you carve to fill the holes will have
the same problem. You'll have to seal, and then match the stain
to the specific area on the stock. In order to do all of that, you'll
have to remove the filler you already put in.
Me? I'd shoot it and enjoy it at this point. Keep your eyes peeled for a
good deal on a replacement stock if it bothers ya that much.
I've kinda looked at repairs two ways over the years. One, make things
perfect and the repairs invisible. Two, if you're gonna have to see it,
make a good, workmanlike job. In this case, I think the former is unachievable,
and you've done a good job with the latter.
-Stretch
- Borregos
- Advanced Levergunner
- Posts: 4756
- Joined: Thu Sep 13, 2007 7:40 am
- Location: Ontario, Canada
Re: Need some input with my failed attempt at wood filler.
It looks pretty good as it is to me
Pete
Sometimes I wonder if it is worthwhile gnawing through the leather straps to get up in the morning..................
Re: Need some input with my failed attempt at wood filler.
Heck, just leave it.....it's unique, not unsightly, and tells a story.
The Rotten Fruit Always Hits The Ground First
Proud Life Member Of:
NRA
Second Amendment Foundation
Citizens Committee For The Right To Keep And Bear Arms
DAV
Proud Life Member Of:
NRA
Second Amendment Foundation
Citizens Committee For The Right To Keep And Bear Arms
DAV
-
- Levergunner 3.0
- Posts: 824
- Joined: Tue Apr 10, 2007 8:09 pm
- Location: New Mexico
- Contact:
Re: Need some input with my failed attempt at wood filler.
At this point, I think the only option you have is a replacement stock. Everyone's idea about what a rifle should look like is different. The fella that owned it before you wanted a rustic frontier treatment, and went so far as to replace the carbine butt stock with a traditional rifle crescent butt and plate. He then decorated it nicely with tacks. A replacement carbine stock would be "correct" for that model year, and should be easy to find. Check ebay.
If you can read this, thank a teacher. If you can read this in English, thank a Vet!
COMNAVFORV, Vietnam 68-70
NRA Life, SASS Life, Banjo picking done cheap!
Quyana cekneq, Neva
COMNAVFORV, Vietnam 68-70
NRA Life, SASS Life, Banjo picking done cheap!
Quyana cekneq, Neva
Re: Need some input with my failed attempt at wood filler.
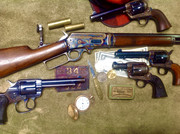
Grizzly Adams wrote:At this point, I think the only option you have is a replacement stock. Everyone's idea about what a rifle should look like is different. The fella that owned it before you wanted a rustic frontier treatment, and went so far as to replace the carbine butt stock with a traditional rifle crescent butt and plate. He then decorated it nicely with tacks. A replacement carbine stock would be "correct" for that model year, and should be easy to find. Check ebay.
I work two blocks from a company called "Western Gun Parts". They have unfinished walnut stocks with buttplate for 100.00. I may go that route!! They look nice as well...
"Courage is being scared to death but saddling up anyways" - John Wayne -
- Sixgun
- Posting leader...
- Posts: 18737
- Joined: Sun Sep 16, 2007 7:17 pm
- Location: S.E. Pa. Where The Finest Winchesters & Colts Reside
Re: Need some input with my failed attempt at wood filler.
I could fix that stock and nobody could ever tell. I do it all the time for Targetmaster. I've removed social security numbers, names, carvings, rust, etc. that were engraved in the wood, barrels and the metal locks on 200 year old guns and put the patina back in it's place.
I'm not trying to give you a lecture but you should have done it the way Pete & I told you in your last post when you asked how to do it. You still can. Its easily fixable.
Why put a new stock on it? If you do, you will not have a 1972 stock and you will never feel the same way about the gun---read above paragraph ----------------------Sixgun
Before
After
Last edited by Sixgun on Thu Jun 06, 2013 6:34 pm, edited 1 time in total.
Re: Need some input with my failed attempt at wood filler.
There are some furniture scratch repair markers available. They are essentially wood colored magic markers in varied wood colors. But a new stock sounds nice.
Re: Need some input with my failed attempt at wood filler.
Sixgun wrote:I could fix that stock and nobody could ever tell. I do it all the time for Targetmaster. I've removed social security numbers, names, carvings, rust, etc. that were engraved in the wood, barrels and the metal locks on 200 year old guns and put the patina back in it's place.
I'm not trying to give you a lecture but you should have done it the way Pete & I told you in your last post when you asked how to do it. You still can. Its easily fixable.
Why put a new stock on it? If you do, you will not have a 1972 stock and you will never feel the same way about the gun---read above paragraph ----------------------Sixgun
Before
After
I don't think that crescent butt stock was original to begin with....
"Courage is being scared to death but saddling up anyways" - John Wayne -
- Sixgun
- Posting leader...
- Posts: 18737
- Joined: Sun Sep 16, 2007 7:17 pm
- Location: S.E. Pa. Where The Finest Winchesters & Colts Reside
Re: Need some input with my failed attempt at wood filler.
Your right. I just took a "look-see" and noticed the wood to metal fit, plus, that era gun had the shotgun style.Win94 wrote: I don't think that crescent butt stock was original to begin with....
How does the condition and color of the buttstock and forend match up? If they match, you will most likely have to buy both. Your pictures show a close match. Its very hard to get an aftermarket stock to match up due to grain density and where the walnut actually grew, along with previous deep stains and other chemicals that may or may not been added.
Look here young man, (I have a son born the same year as you )
Take off all of the wood....................buy some quality stripper and strip the wood down all the way. Either mechanically or chemically remove what you put in there. Remember, those original holes were tack holes, what? 1/32"...1/16" at the largest?
Grind some walnut down to a dust and mix it with "stainable wood glue". Verrrrrrryyyyyyy carefully fill in the holes leaving it a tiny bit high, also being careful NOT to get glue in the wood next to the hole.............
Wait a day and get a very small piece of steel wool or 400 grit and sand down the high spot, again being verrrrrryyyyyy careful not to sand the surrounding wood around the hole...............................................
get some dark walnut stain and follow directions......................wait a day..................apply a oil finish.................................wait a day and do it again, this time rubbing it in with 0000 steel wool.....after 15 minutes, wipe off with clean paper towel ....................wait a day and do it again with steel wool and paper.............................do it one more time if need be...................wait another day or two before handling................she will look new ----------------Sixgun
Re: Need some input with my failed attempt at wood filler.
Sixgun wrote:Your right. I just took a "look-see" and noticed the wood to metal fit, plus, that era gun had the shotgun style.Win94 wrote: I don't think that crescent butt stock was original to begin with....
How does the condition and color of the buttstock and forend match up? If they match, you will most likely have to buy both. Your pictures show a close match. Its very hard to get an aftermarket stock to match up due to grain density and where the walnut actually grew, along with previous deep stains and other chemicals that may or may not been added.
Look here young man, (I have a son born the same year as you )
Take off all of the wood....................buy some quality stripper and strip the wood down all the way. Either mechanically or chemically remove what you put in there. Remember, those original holes were tack holes, what? 1/32"...1/16" at the largest?
Grind some walnut down to a dust and mix it with "stainable wood glue". Verrrrrrryyyyyyy carefully fill in the holes leaving it a tiny bit high, also being careful NOT to get glue in the wood next to the hole.............
Wait a day and get a very small piece of steel wool or 400 grit and sand down the high spot, again being verrrrrryyyyyy careful not to sand the surrounding wood around the hole...............................................
get some dark walnut stain and follow directions......................wait a day..................apply a oil finish.................................wait a day and do it again, this time rubbing it in with 0000 steel wool.....after 15 minutes, wipe off with clean paper towel ....................wait a day and do it again with steel wool and paper.............................do it one more time if need be...................wait another day or two before handling................she will look new ----------------Sixgun
Thank you so much for the instructions. I have copied and saved them and will apply this during the winter. For now I am going to grab a Williams Reciever sight and hunt the heck out of that carbine this fall!!!
"Courage is being scared to death but saddling up anyways" - John Wayne -
Re: Need some input with my failed attempt at wood filler.
I also think it looks fine the way it is.